From breakfast to dinner, from healthy meals to sweet desserts – Next Yum Recipes brings you quick, simple and tasty ideas for every occasion and every time.


 This Recipe
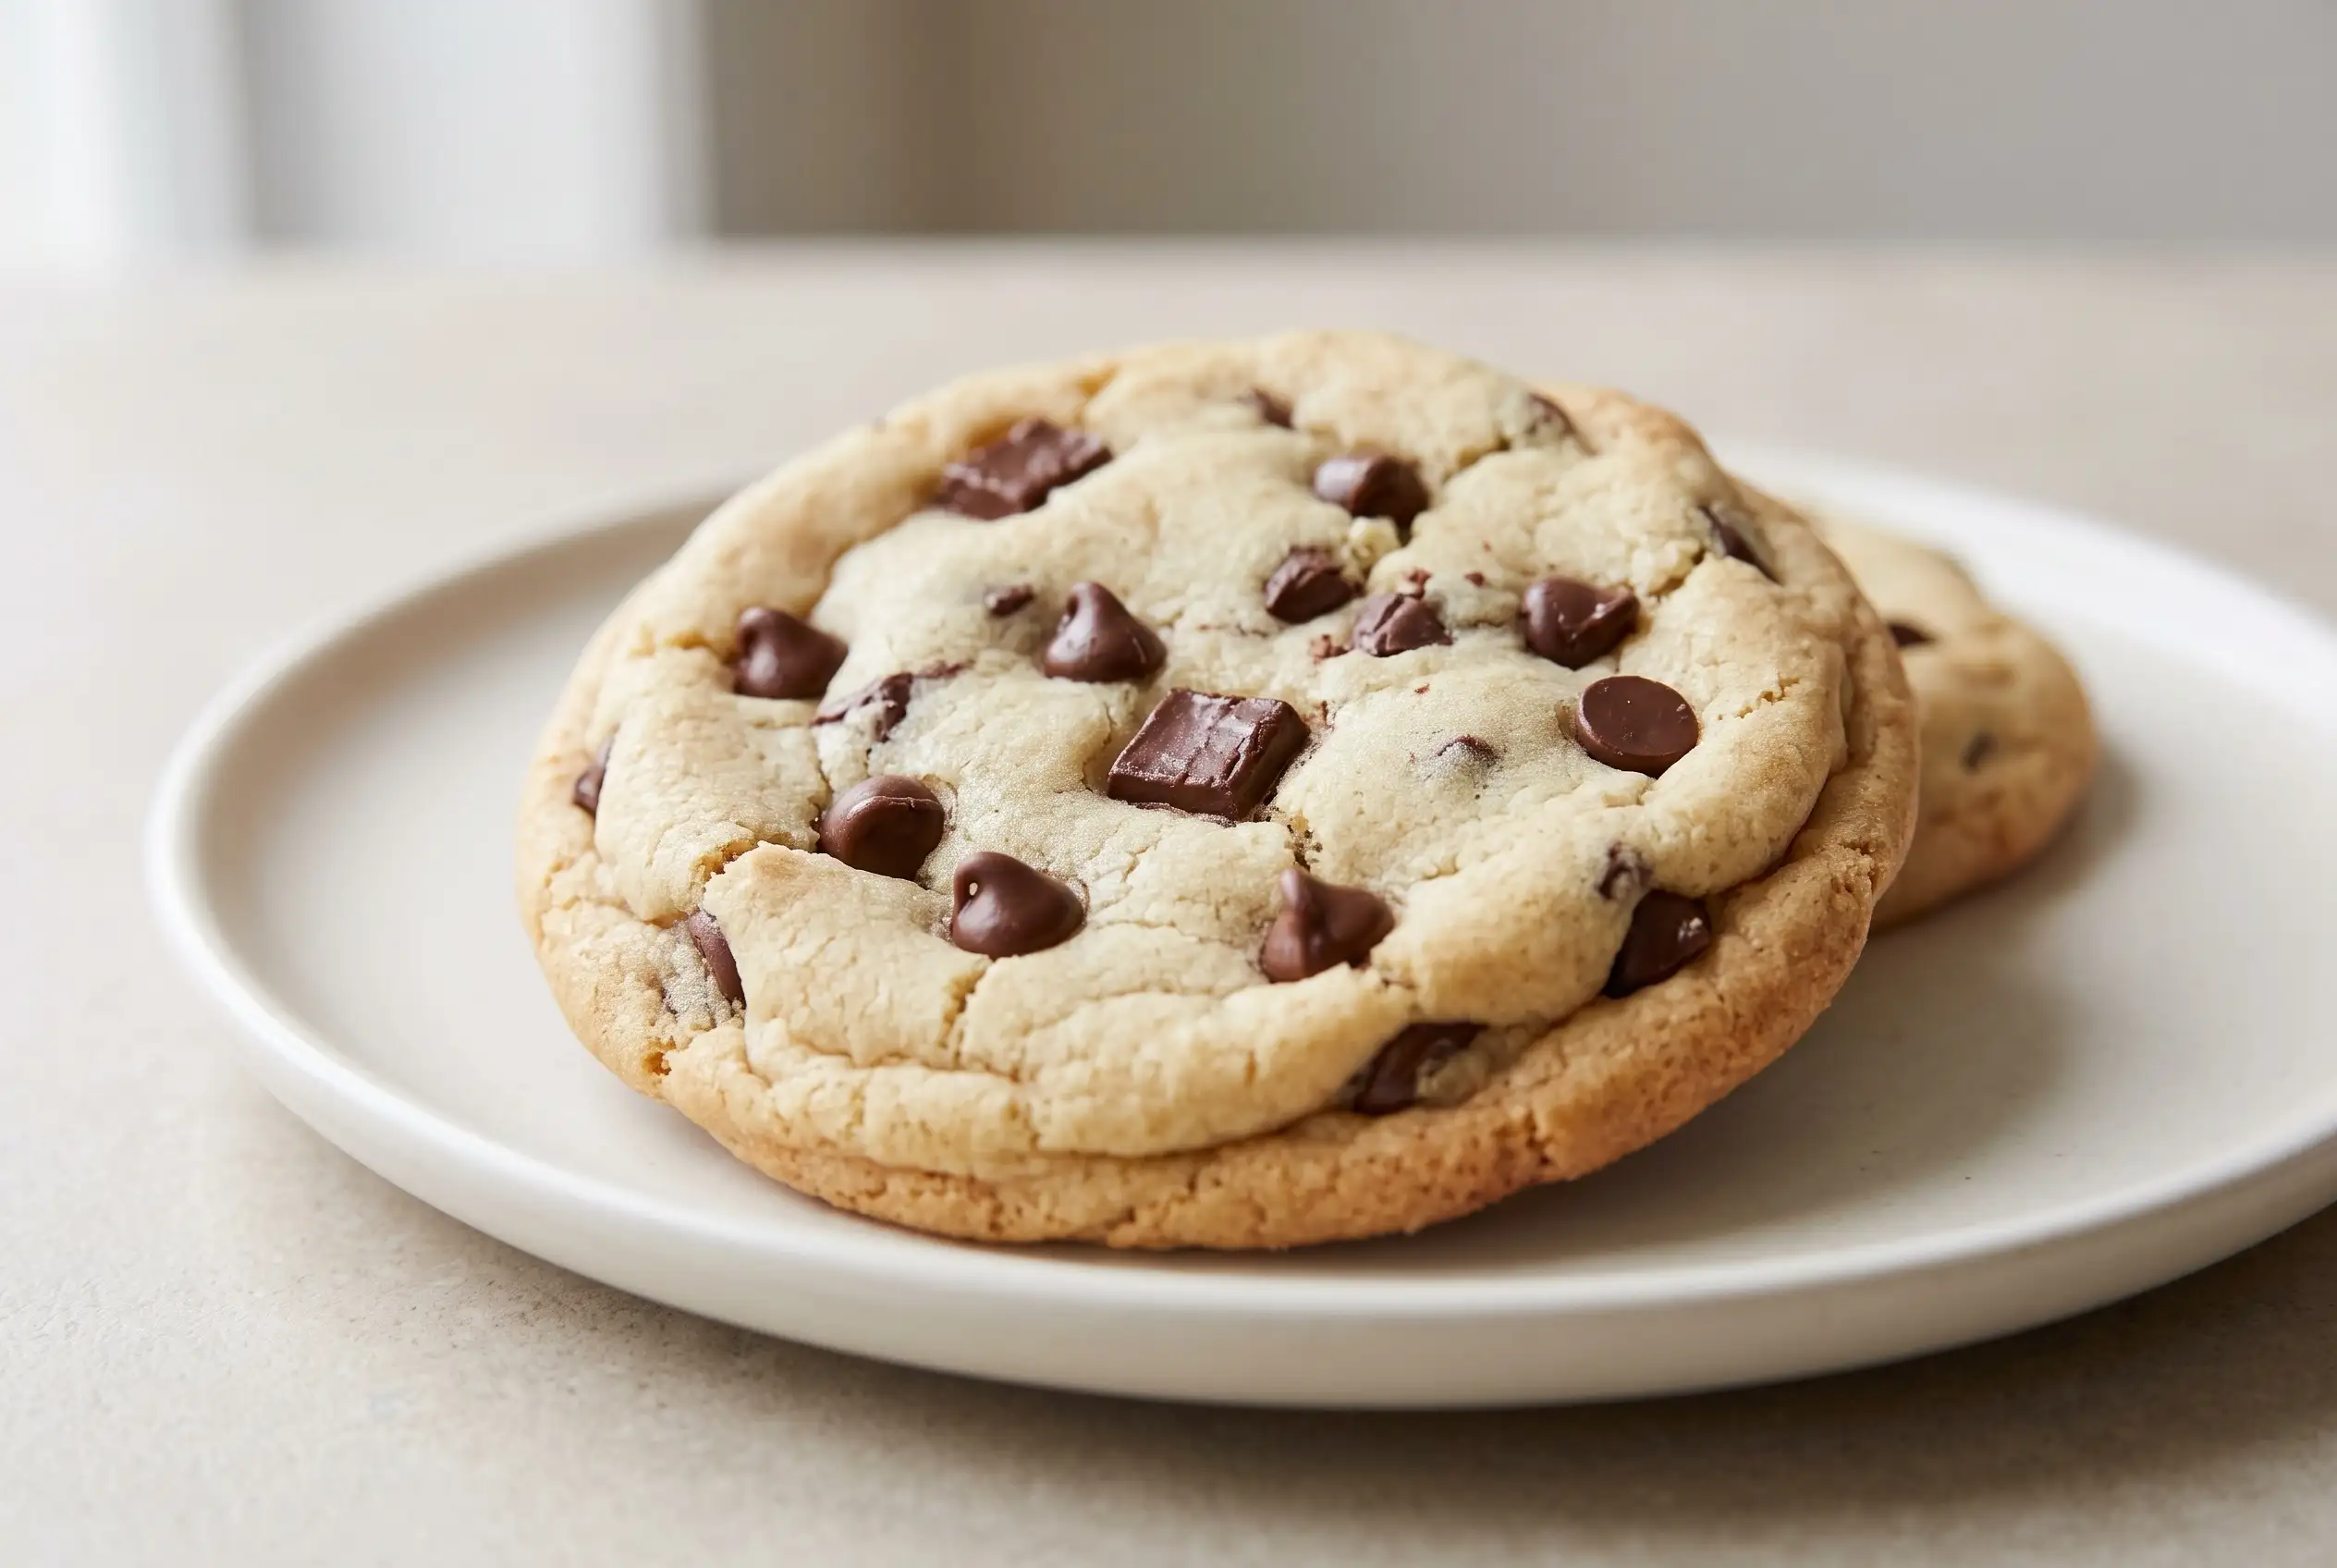
Soft chocolate chip cookies depend less on elaborate ingredients than on a few precise handling choices. Barely melted butter, restrained mixing, a dough that sits between wet and dry, and an intentionally short bake create cookies that leave the oven pale and puffy before settling into a dense, buttery center. The most important visual cue comes before the cookies look completely baked, because waiting for deep color can push them past the soft texture that makes them distinctive.
Among easy soft chocolate chip cookies, this version stands out for using a straightforward dough with both white and brown sugar and plenty of chocolate chips or chunks. Coarser raw cane sugar can also be used for the white sugar, giving the finished cookies a slightly different surface texture while preserving the same basic balance. Understanding how the butter, dough consistency, shaping, oven cues, and cooling period interact makes the results much more predictable.
Barely Melted Butter Sets the Soft Cookie Texture
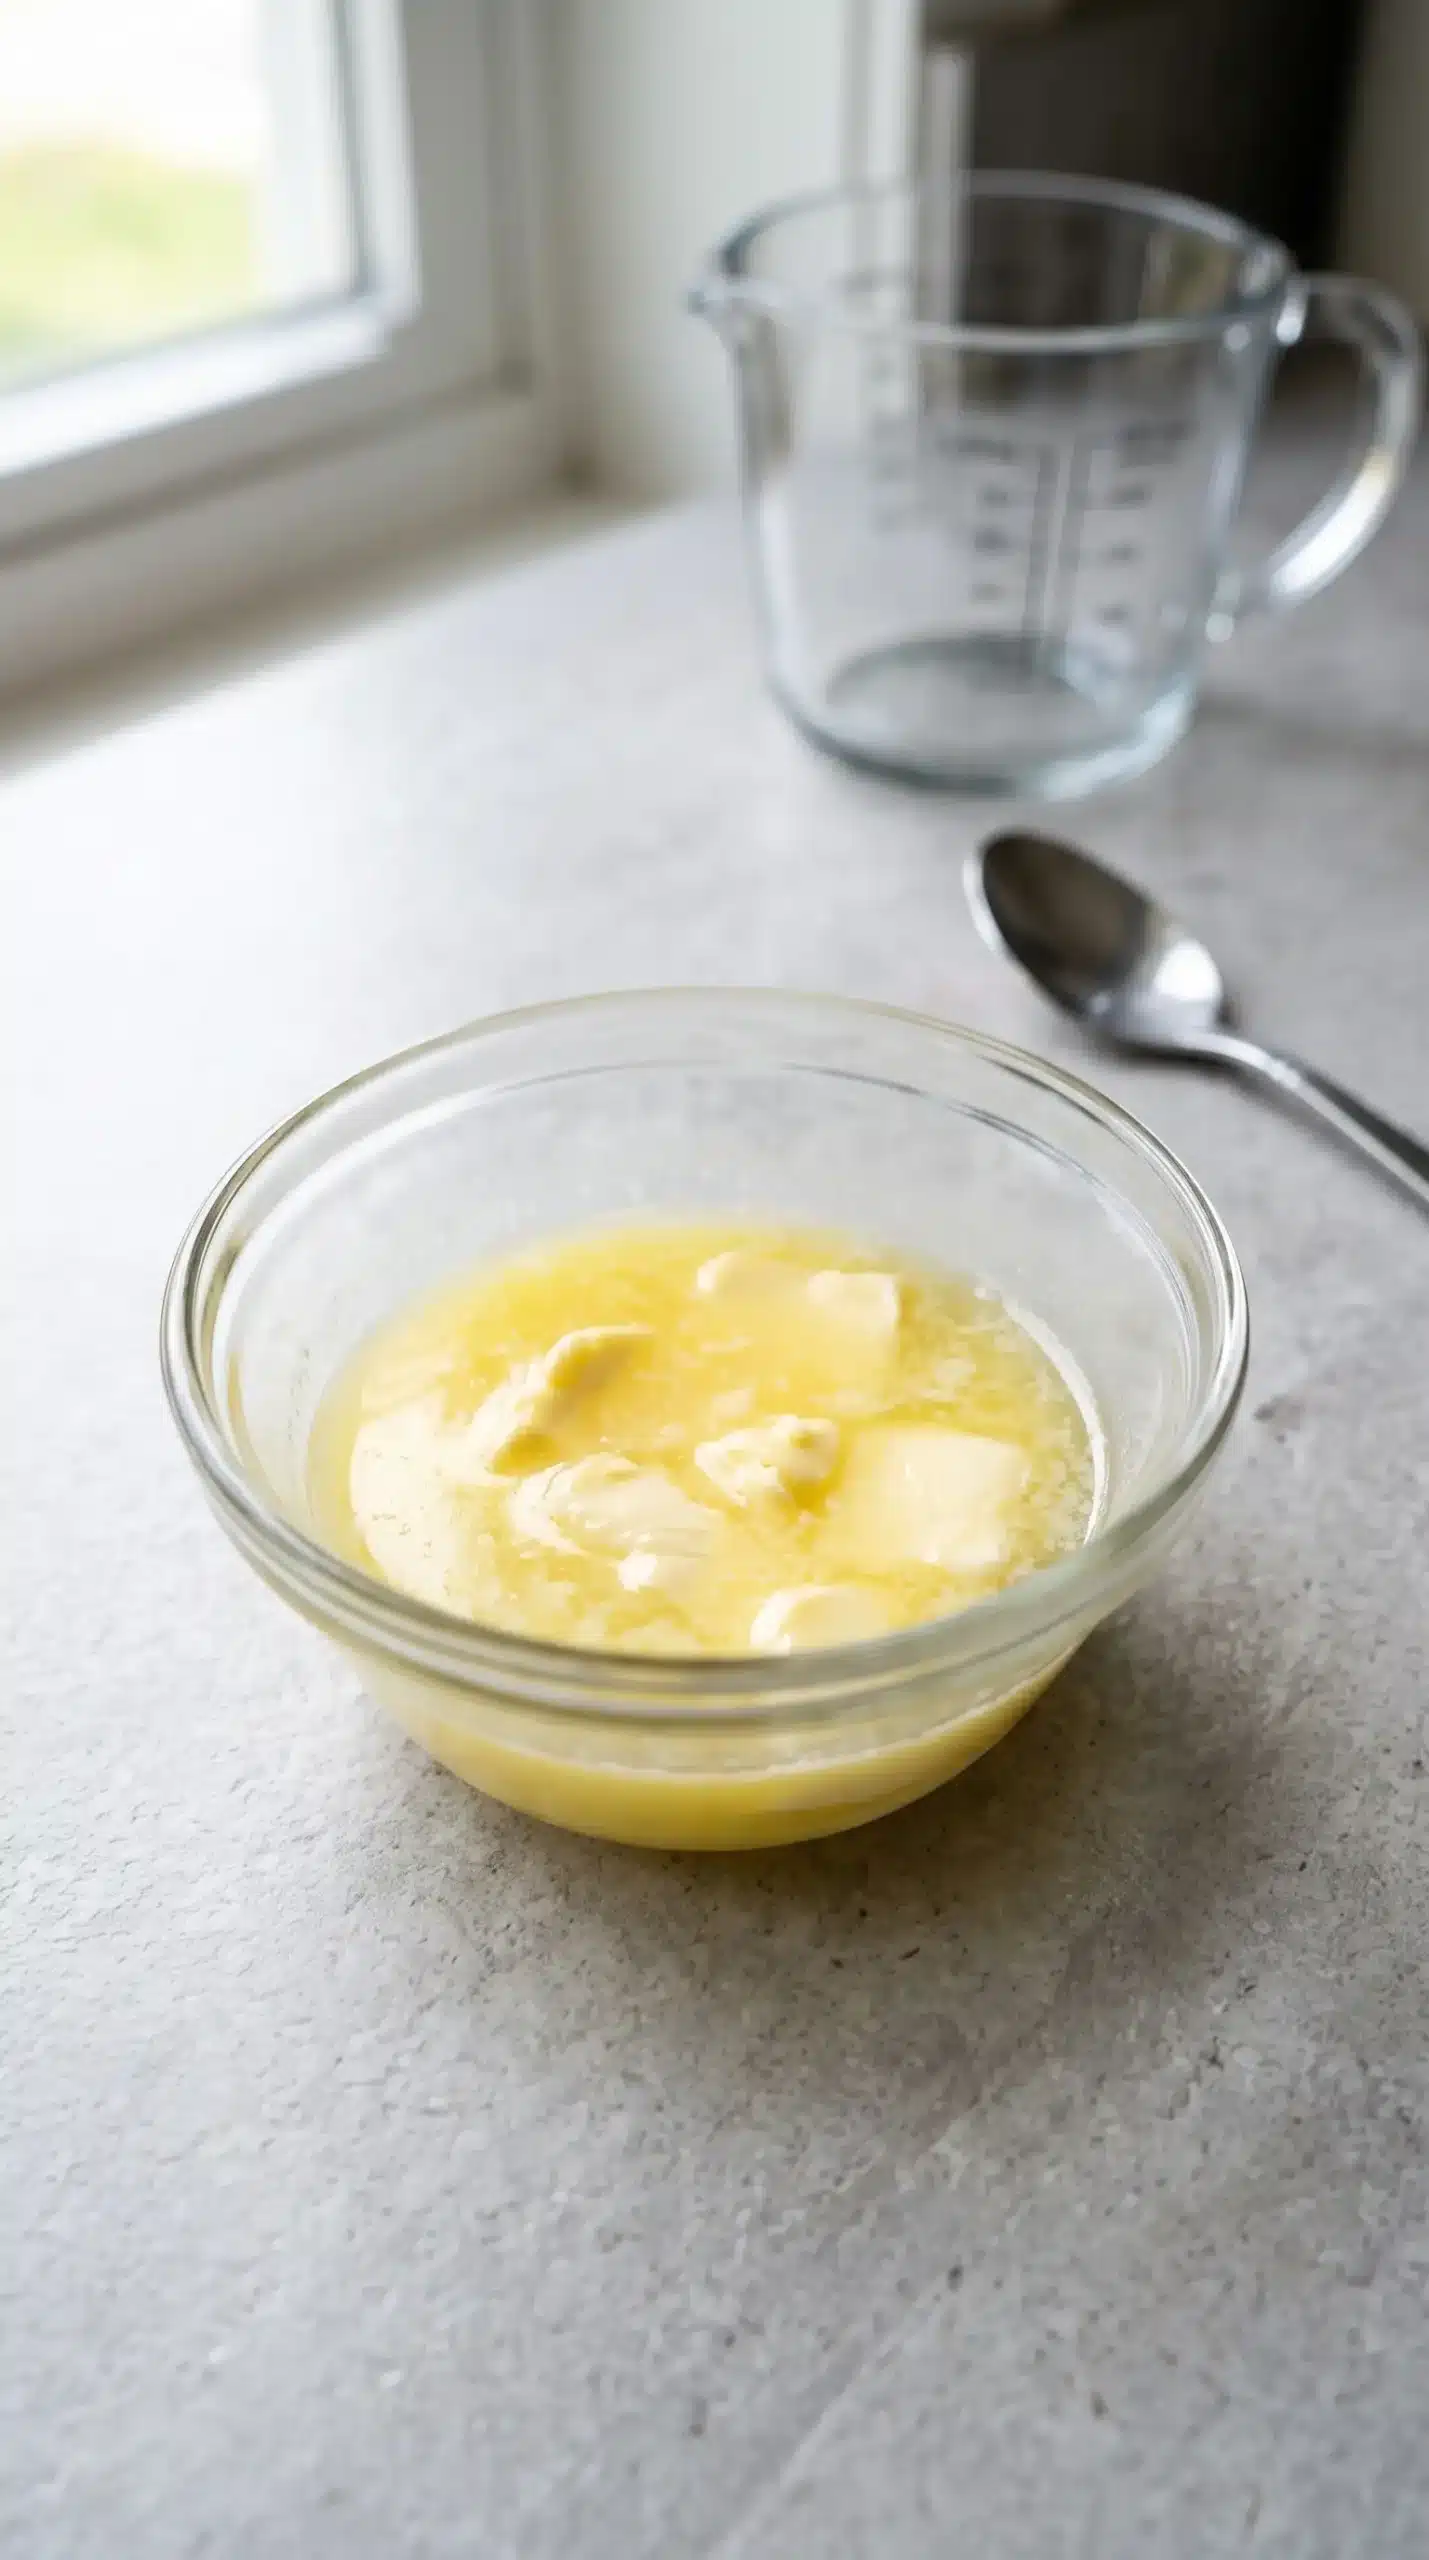
Butter should be almost entirely liquid but still cool enough that it does not feel hot. That narrow condition matters because fully hot melted butter can loosen the dough too much and affect how the egg behaves when it is added. Butter that remains largely solid, meanwhile, will not combine with the sugars in the same creamy way intended here.
A short microwave burst usually brings the butter close to the right state, but appearance is more useful than blindly following a fixed heating interval. Small soft pieces are acceptable as long as the butter is mostly fluid and can blend smoothly with the sugars.
Once combined, the butter and sugars should look creamy instead of greasy or separated. That mixture becomes the foundation for buttery chocolate chip cookies with a compact, tender interior rather than a dry, cakey crumb.
The Sugar Blend Affects Both Structure and Bite
White sugar makes up the larger share of the sweetener, while a smaller amount of packed light brown sugar contributes moisture and a softer chew. Using coarse raw cane sugar in place of ordinary granulated sugar can leave a little more textural character in the finished cookie, especially around the surface.
Flour Measurement Keeps the Dough in Its Narrow Sweet Spot
Because the dough is intended to become crumbly before it is pressed together by hand, flour quantity has a strong effect on whether that transition happens correctly. Measuring by weight gives more consistent control because the amount of flour in a cup can vary considerably with how densely it is filled.
Too little flour can leave the mixture sticky and difficult to roll, while too much can prevent the crumbs from binding into one pliable mass. The desired dough should hold together when pressed without feeling wet enough to smear across the hands.
That texture is particularly important for soft and chewy chocolate chip cookies because the dough needs enough structure to remain thick in the oven while still containing enough moisture and fat to settle into a soft center after cooling.
Brief Egg Mixing Helps Prevent a Stiff Cookie
Once the vanilla and egg enter the butter mixture, they only need enough mixing to become incorporated. Extended beating can change the texture and is specifically worth avoiding here, since the intended cookie is dense and soft instead of airy or firm.
The Dough Should Look Crumbly Before It Comes Together
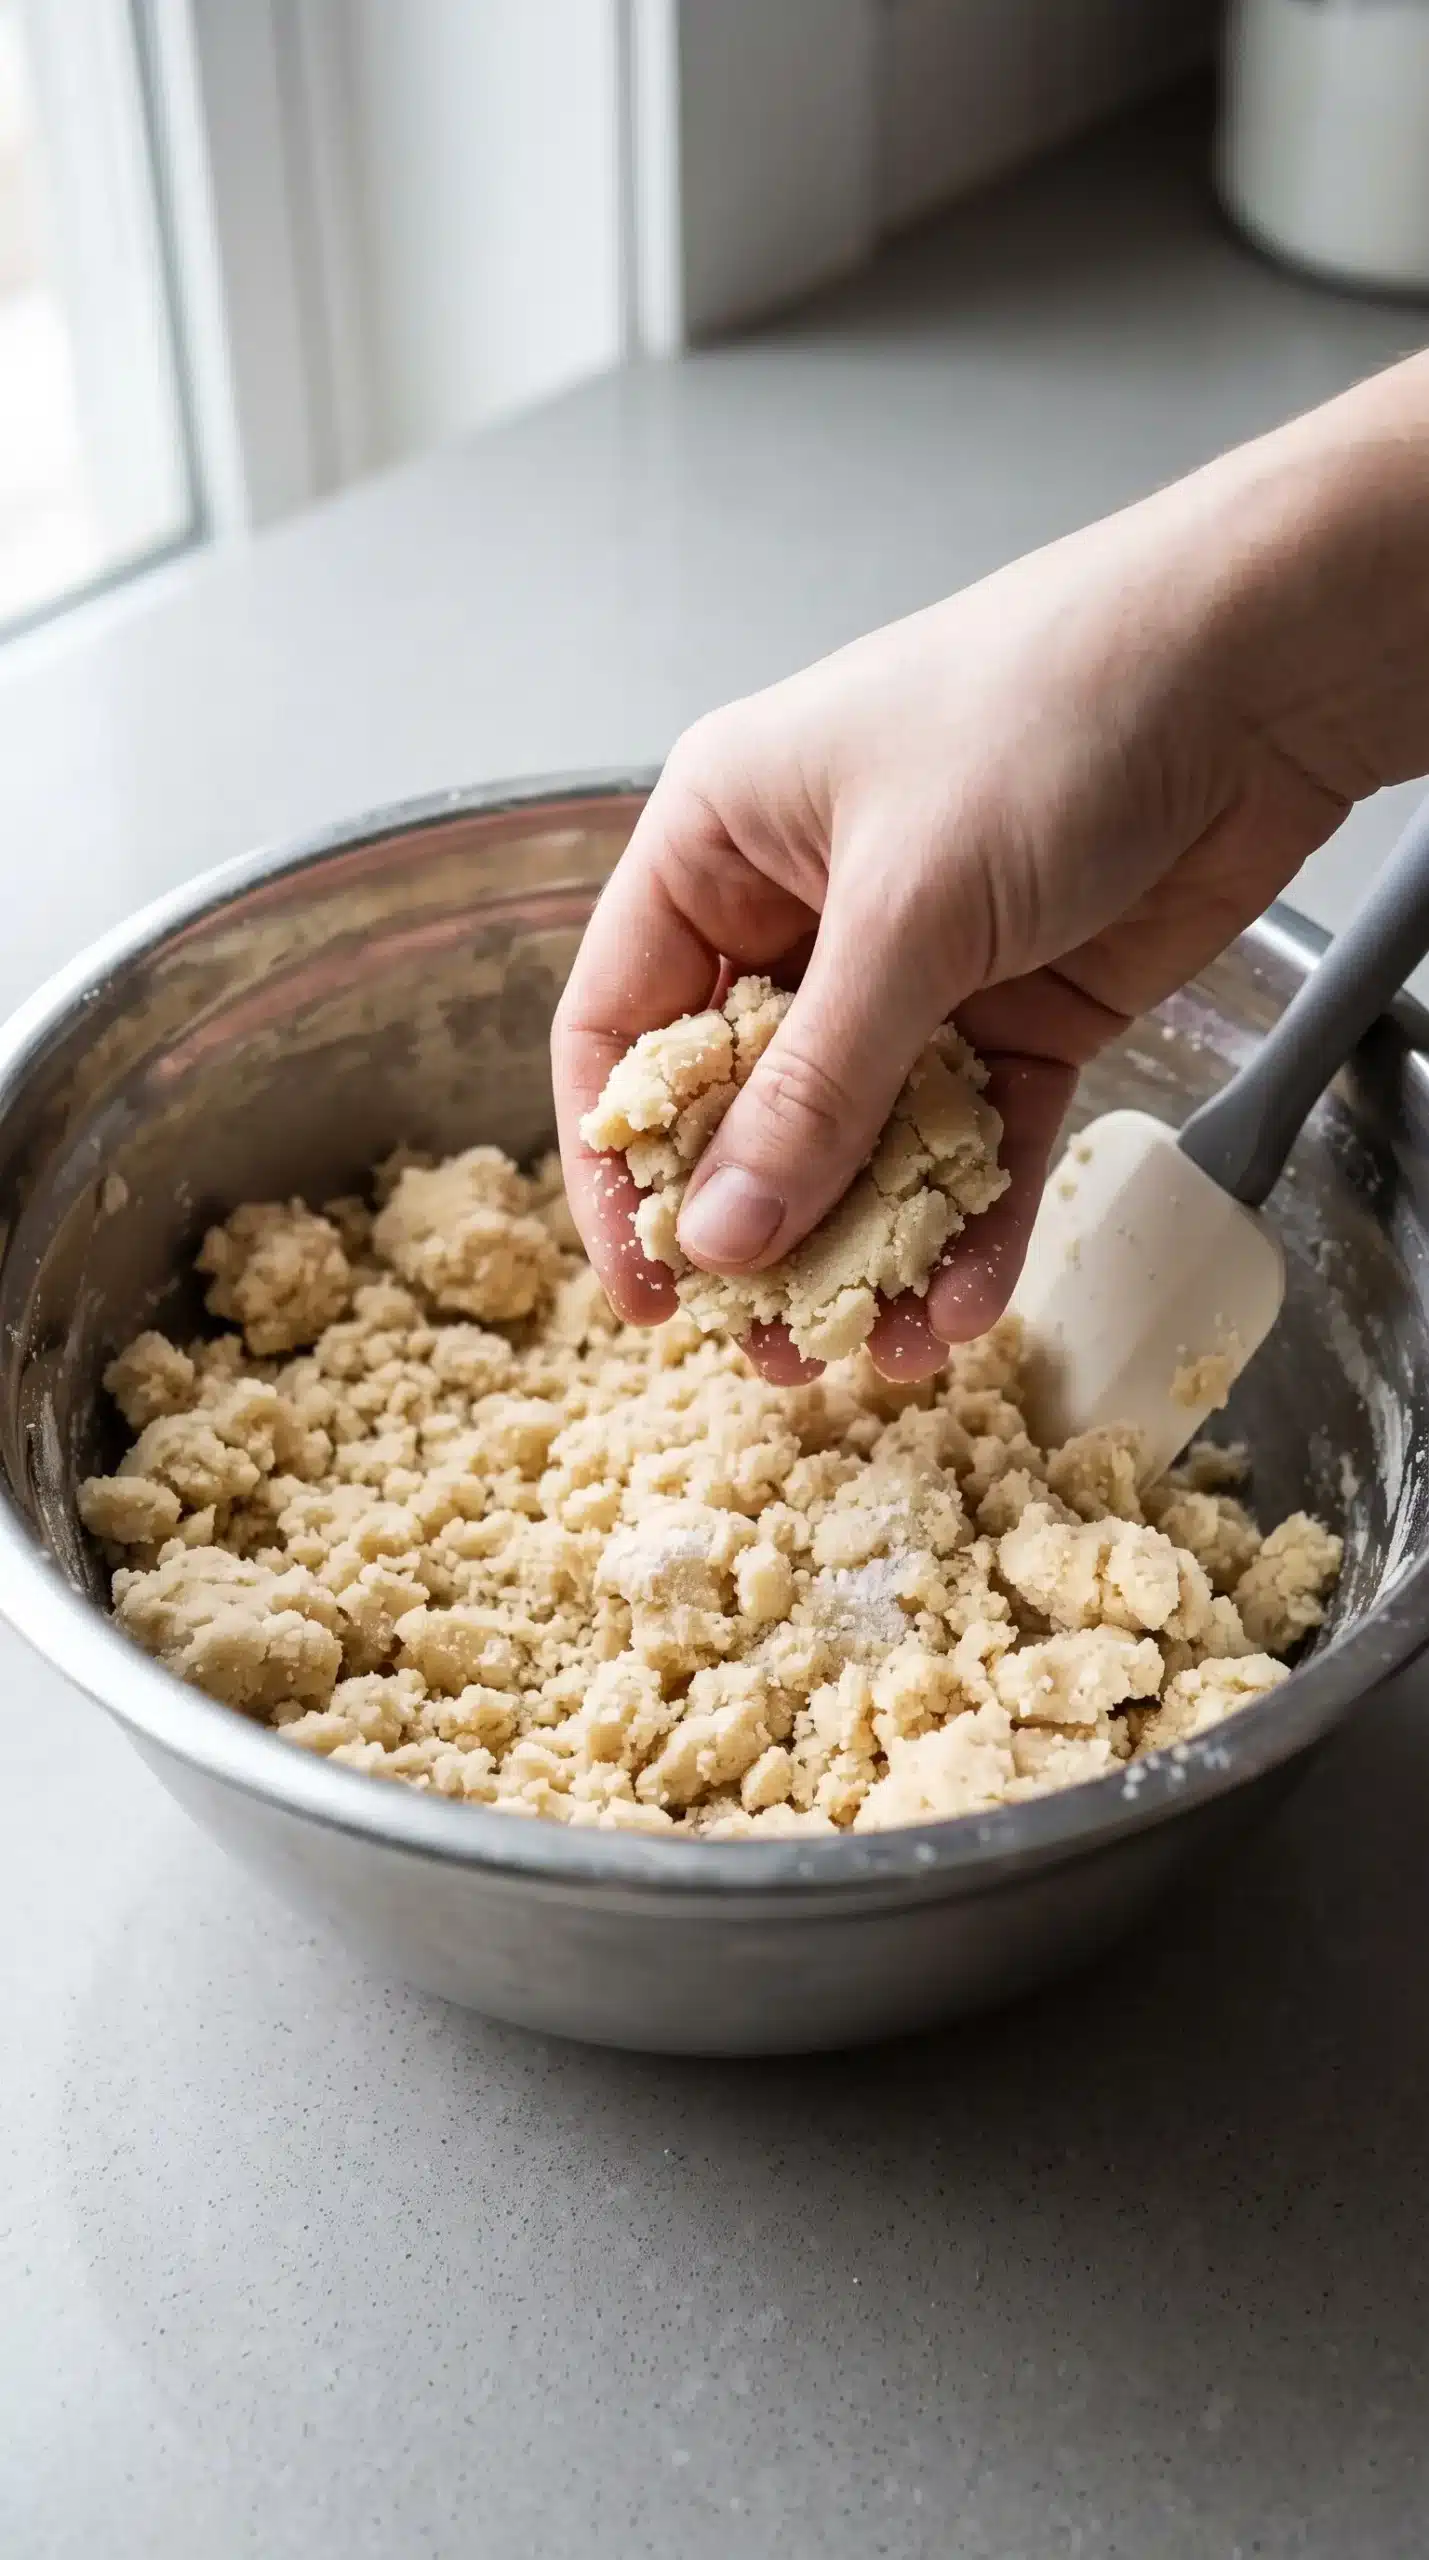
After the dry ingredients are mixed in, the bowl may initially look more like coarse crumbs than conventional smooth cookie dough. That appearance is expected. Pressing the mixture together by hand should transform those crumbs into one manageable ball without requiring extra liquid.
Texture provides a better checkpoint than forcing the dough to match a perfectly smooth appearance. A workable batch should sit directly between obviously damp dough and loose, floury crumbs.
- Too wet: the dough smears on the hands and struggles to keep a rounded shape.
- Just right: the crumbs press together easily into a soft, cohesive ball that can be rolled.
- Too dry: the mixture breaks apart even after firm pressing and does not stay joined.
If the texture already falls in the middle range, continued mixing is unnecessary. Handling only until the dough holds together helps preserve the compact tenderness expected from soft chocolate chip cookies.
Chocolate Chunks Create More Varied Pockets
A combination of standard chocolate chips and larger chocolate chunks gives the cookies a less uniform chocolate distribution. Smaller chips spread through more bites, while chunks create broader pockets that remain especially noticeable in the center of a thick cookie.
Large Dough Balls Protect the Soft Centers
Forming a relatively small number of large dough balls produces thick cookies with enough interior mass to stay soft while the outside sets. Making even larger portions exaggerates that effect, although the cookies may need close observation because size changes how quickly the center catches up with the surface.
Hand rolling also gives an immediate final check on dough consistency. Properly balanced dough should shape cleanly without flowing outward on the baking sheet or cracking apart under light pressure.
Spacing still matters because the cookies will spread as the butter warms. Leaving room around each dough ball allows the edges to develop independently instead of merging into neighboring cookies.
Pale and Puffy Is the Critical Baking Cue
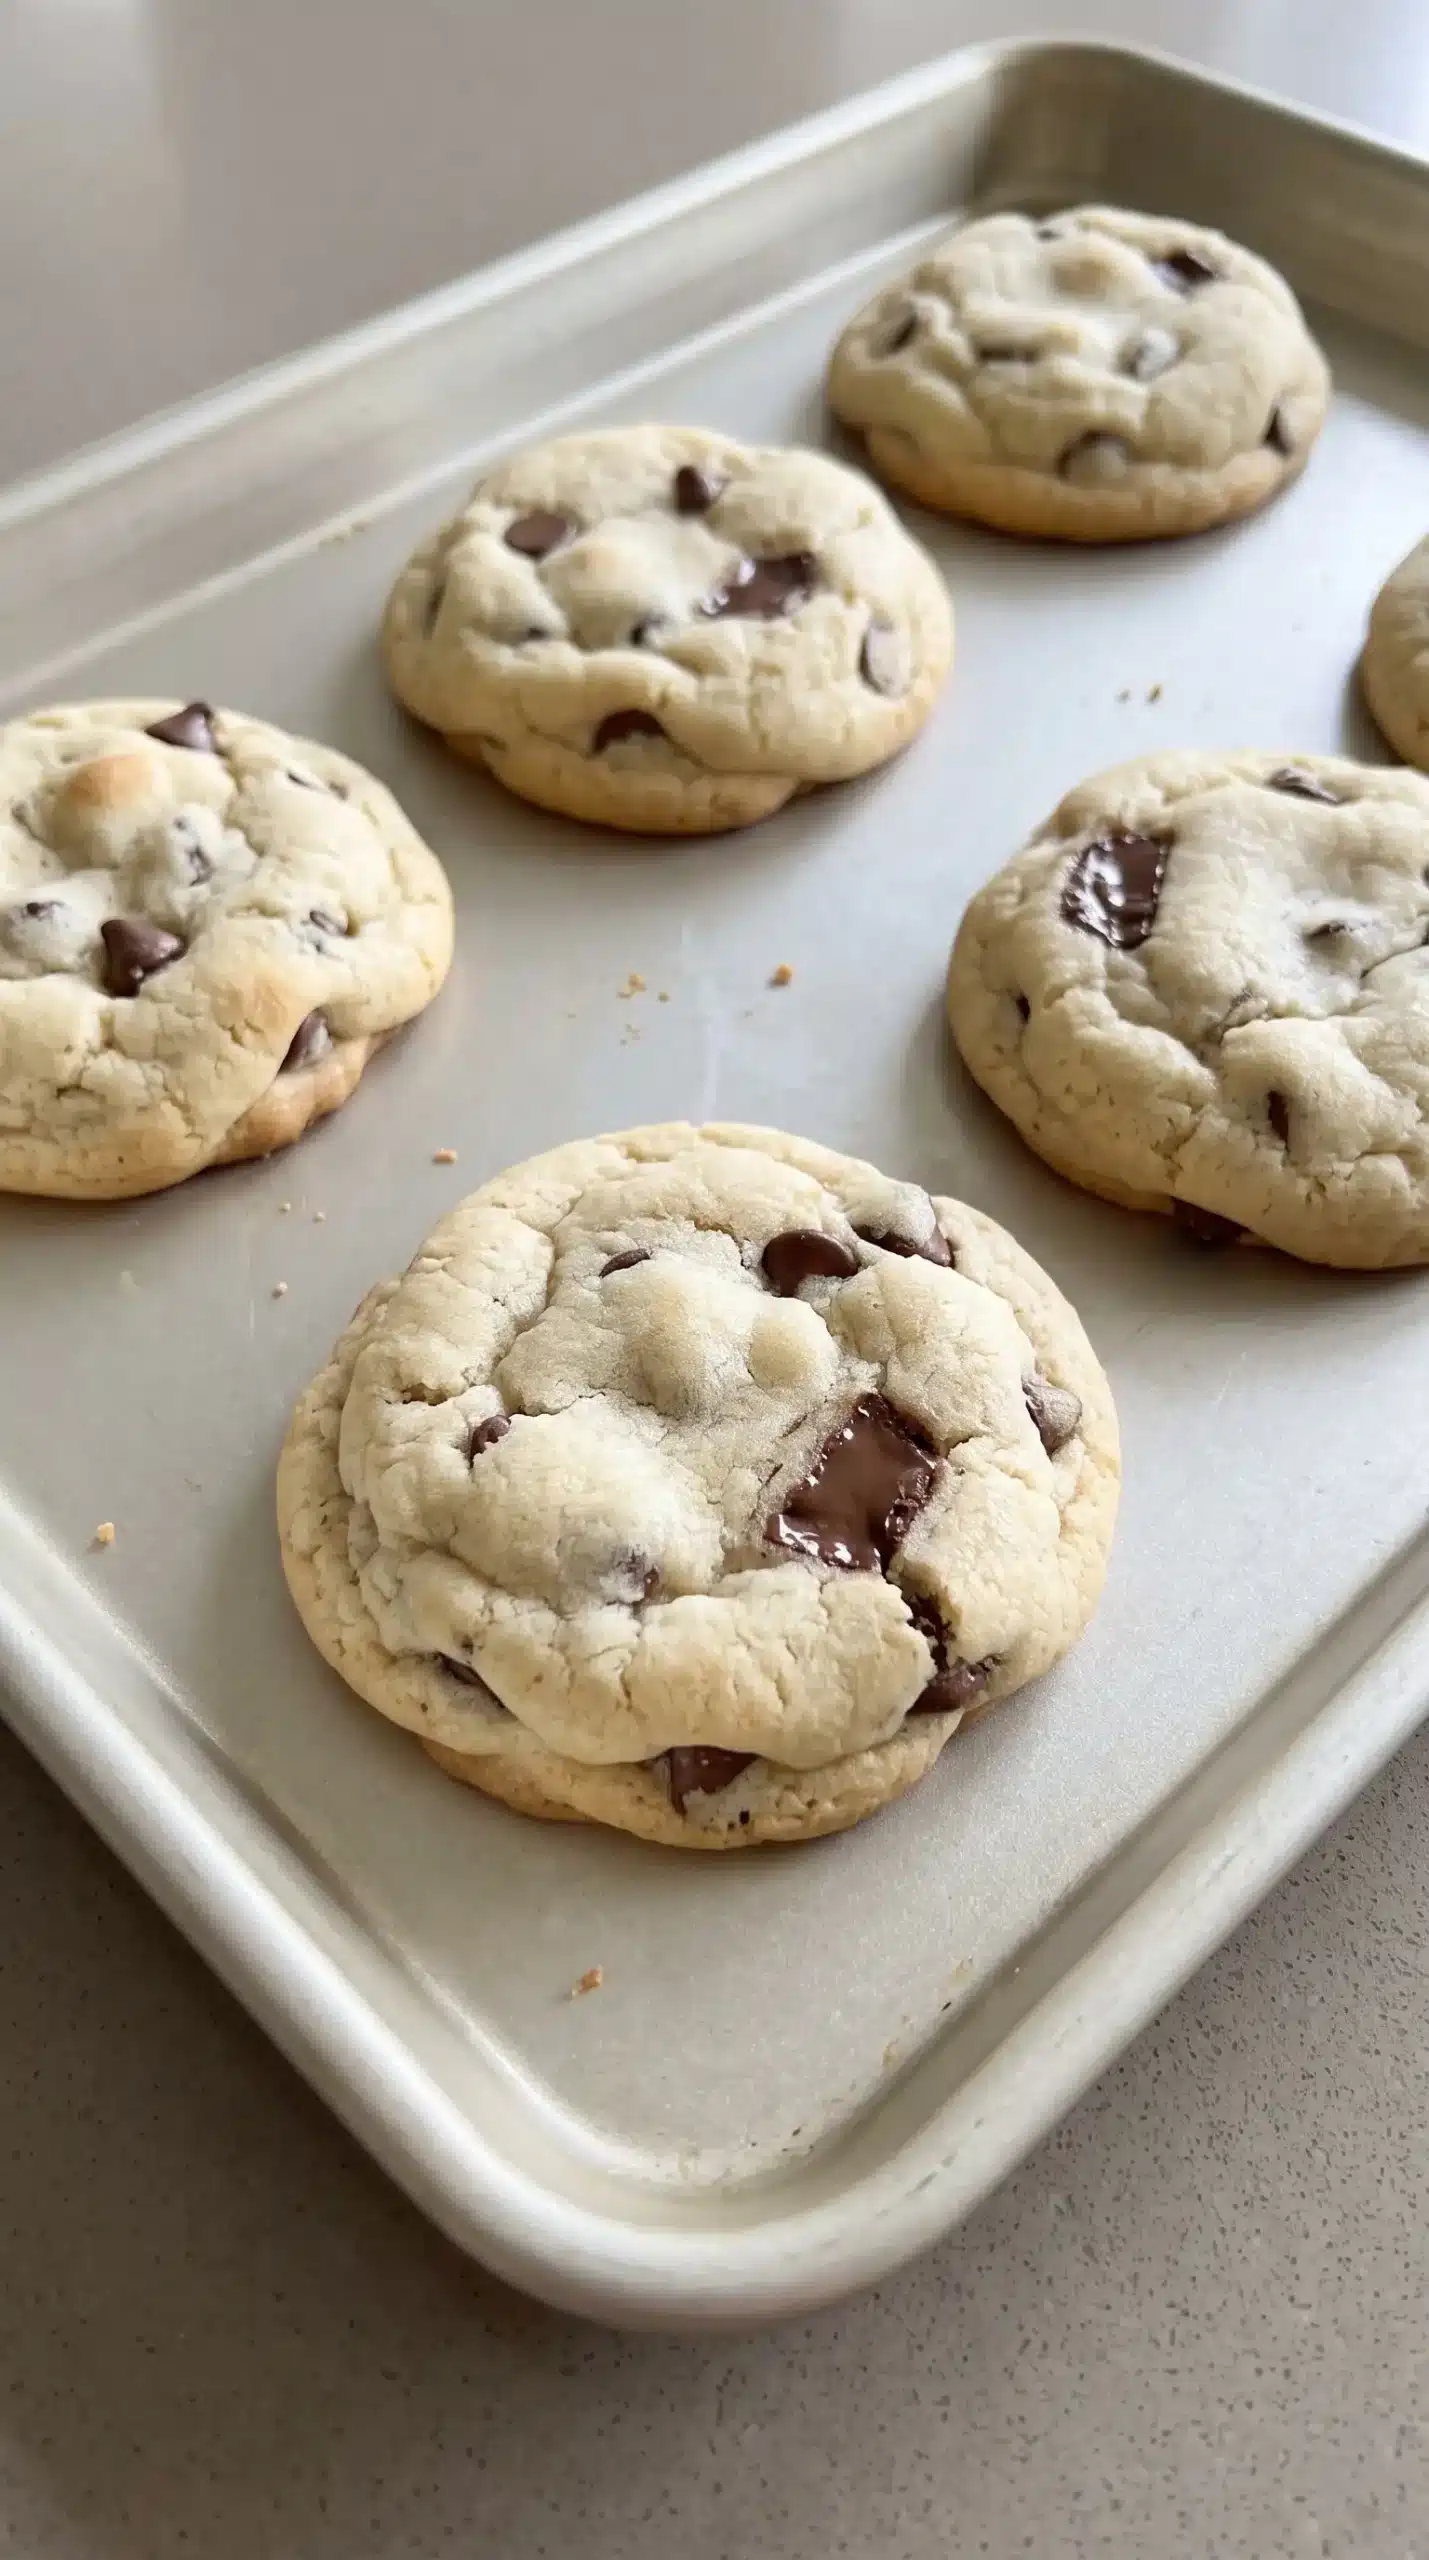
Oven control is the decisive stage for keeping these cookies soft. The dough is baked at 350 degrees until the tops look dry and puffy and the edges show only the faintest amount of golden color. Waiting until the entire cookie appears fully browned will usually mean the center has gone farther than intended.
| What you see | What it indicates | Best response |
|---|---|---|
| Shiny or visibly wet surface | The exterior has not set yet | Continue baking and check again shortly |
| Puffy, pale, dry-looking top | The cookie is near the ideal removal point | Remove while the center still appears slightly underdone |
| Noticeably golden across the top | More moisture has already baked away | Remove immediately to limit further drying |
| Deeply browned edges and firm center | The cookie has moved beyond the intended soft stage | Use the visual cue earlier on the next batch |
Residual heat continues working after the pan leaves the oven. That carryover is exactly why the cookies should be removed before they look conventionally finished. Their initially pale appearance is not a defect but part of the process that produces a dense, soft interior.
For the most consistent results, judge doneness through appearance instead of color alone. A dry-looking surface paired with minimal browning is far more informative for these cookies than waiting for a crisp-looking edge.
Cooling on the Pan Finishes the Structure
Freshly baked cookies will be puffy and delicate when they first come out. Leaving them undisturbed on the baking sheet allows the centers to finish setting as the cookies gradually sink into their characteristic dense shape.
Common Soft Chocolate Chip Cookie Mistakes to Avoid
Several problems that seem small during mixing or baking can noticeably change the finished texture. Most are connected to heat, mixing, dough consistency, or the temptation to keep baking until the cookies look completely done.
- Heating the butter too far: very hot butter can make the mixture looser than intended before the egg is added. Stop when it is barely melted and mostly liquid.
- Beating the egg excessively: prolonged mixing can move the cookie toward a stiffer texture. Incorporate the egg briefly on low speed.
- Ignoring crumbly dough: the mixture is supposed to look crumbly before hand pressing. Do not assume that appearance means more liquid is automatically needed.
- Chasing deep browning: waiting for strongly colored tops removes more moisture from the centers. Pull the cookies when they remain pale, puffy, and just set on the surface.
- Moving them too soon: hot cookies are still structurally fragile. Allow the pan to support them while they settle and firm.
Corrections are easiest when the cook responds to observable signs instead of trying to force every batch into an identical appearance. Flour absorption, portion size, and individual ovens can all affect how quickly the dough reaches the desired stage.
Small adjustments should therefore focus on the specific problem. Sticky dough points toward the flour-and-fat balance, while dry cookies point more directly toward baking too long or removing too much moisture during the oven stage.
Airtight Storage Preserves the Dense Soft Center
Once completely cooled, the cookies are best kept in an airtight container so the exposed surface does not dry out unnecessarily. Their dense structure is well suited to staying soft for several days when protected from open air, and freezing is also practical when a batch needs to be kept longer.
Frozen baked cookies should be cooled fully before being packed so trapped warmth does not create condensation inside the container. Separating layers when necessary also helps protect the soft cookies from sticking together.
Because their texture is already compact and buttery, these cookies generally handle freezing better than very crisp styles that depend on a dry surface. Letting a frozen cookie return to a comfortable eating temperature restores much of its familiar softness without additional baking.
Soft Chocolate Chip Cookies Depend on an Early Exit from the Oven
Pale, puffy cookies that look slightly unfinished at removal are the strongest indicator that the centers still contain the moisture needed for a soft result. Barely melted butter and carefully balanced dough establish the structure, but stopping the bake at the correct visual stage is what protects that work from being lost.
Cooling then converts the delicate hot cookies into the dense, buttery texture associated with the best soft chocolate chip cookies. Trusting that change on the pan is more effective than leaving them in the oven until they already look firm.
Soft Chocolate Chip Cookie Questions About Spreading, Doneness, and Texture
Why did my cookies spread more than expected?
Excessively warm butter or unusually soft dough can encourage more spreading before the exterior sets. Let barely melted butter stay cool, measure the flour carefully, and make sure the finished dough can be rolled into balls that hold their shape without slumping.
Can I use only chocolate chips instead of mixing chips and chunks?
Yes. Using only chips will still work, but the chocolate will be distributed more evenly and the cookies will have fewer large melted pockets. Combining sizes mainly changes the eating texture, not the basic dough structure.
Why do the cookies look underbaked when they come out?
The centers are intentionally removed while they still appear softer than a fully finished cookie. Heat stored in the pan and dough continues setting the interior after baking, so an initially pale, puffy appearance is compatible with a properly finished soft cookie once cooled.
Can the dough balls be made smaller?
Smaller portions are possible, but they have less thick interior space protecting the soft center. Watch them carefully because smaller cookies generally reach the dry-surface stage sooner, and use the same pale, lightly colored visual cues instead of waiting for strong browning.
Why did my cooled cookies turn out dry?
Dryness most often points to too much flour, baking beyond the pale-and-puffy stage, or both. Check flour measurement first, then remove the next batch as soon as the tops look dry and the cookies are only barely golden around the edges.
Can baked cookies be frozen individually?
Individual freezing works well for convenient portions. Cool the cookies completely, wrap or separate them so they do not stick together, and keep them protected from air in a freezer-safe container before thawing only the amount needed.
Soft Chocolate Chip Cookies with Chocolate Chips and Chunks
Soft chocolate chip cookies with chocolate chips and chunks are dense, buttery, and tender with a soft center and lightly golden exterior. They are an easy dessert when a classic, generously chocolatey cookie is wanted.
Ingredients
Method
Preparation
- Preheat the oven to 350°F (175°C). Microwave the butter for about 40 seconds, stopping when it is almost completely liquid but not hot.
- Beat the melted butter and sugars with a stand mixer or electric beaters until creamy. Add the vanilla and egg, then mix on low speed only until incorporated, about 10-15 seconds.
- Add the flour, baking soda, and salt. Mix until a crumbly mixture forms. Press the crumbs together with your hands until they become one manageable dough ball that is neither wet nor dry.
- Work the chocolate chips, or chocolate chip and chunk combination, into the dough by hand.
- Shape the dough into 12 large balls, or 9 very large cookies, and arrange them on a cookie sheet.
Baking
- Bake for 9-11 minutes, until the cookies are puffy, the surfaces look dry, and they are only just beginning to turn golden.
- Remove the cookies from the oven while they are still pale and puffy rather than waiting for them to become deeply browned.
Cooling
- Leave the cookies on the baking sheet for about 30 minutes so they can settle and develop their dense, soft texture.
Notes
For the intended soft texture, remove the cookies when they are pale, puffy, dry-looking on top, and only barely golden rather than deeply browned.